Please note:
The solution is based on the US version of the game. There may be divergences from the Spanish version.
Casnan
Dopo la scena di intermezzo, seguite le indicazioni di Duren per procedere. Viaggiate verso le miniere, a sud-ovest. Sinistra, fino al vicolo cieco. Superate il monolite, entrate nella miniera. Dopo il tutorial, continuate all'interno della miniera, colpendo anche le rocce che appariranno sulla mini-mappa in alto a destra (potrete così ottenere del carbone). Dovrete ora aprire il cancello, usando l'abilità "Lockpick" di Duren sulla cassa del tesoro visibile a nord-est. Poi entrate e seguite il sentiero sempre avanti, fino al secondo monolite. Salvate il gioco, prima di vedervela con il boss.
Boss: Aldovoss
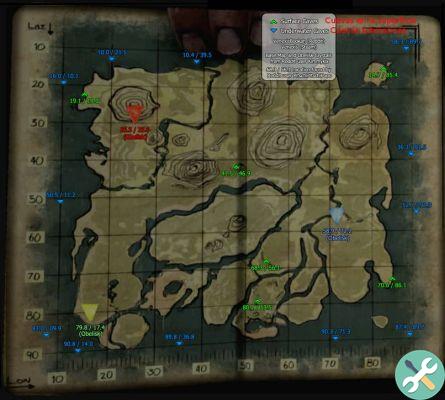
It has 1240 life points. One of the simplest, but also the most effective, strategies is to use a combination of dodges followed by quick shots at the opponent - right after the dodge, when he is completely "exposed". After the fight, enter the room containing the statue. Go back using the monolith. Talk to Governor Griselda. He will take you to the office, asking you to create a map of the great forest.
Beast Plains
You will now need to reach the Forest of Dawn in the northwest area. You can talk to Mucho and Luluca, who will place flags marking the position of the Fabros and Langritz. You can then proceed to the forest. Then proceed beyond the monolith. Observe the cutscene, then continue towards the forest.
Forest of Dawn
Enter the forest, examining the map to locate the "lights" of memory. As soon as you see them, you will have to head in their direction. Then examine the nearby monolith. Avoid exploring the areas to your left and right: they inevitably lead to a dead end. Also pay attention to the Bozuonoga on the right, which has 2400 health points. Now make your way north, examining in detail the cave of the waterfall (you will see it marked on the map). Exit, head east, then north, locating a second monolith. In the area you will therefore locate a large amount of plants and rocks, useful as basic "materials" for your continuation. Your next target is to the west. Make your way west until you find a second monolith.
Vedrete ora due possibilità sulla mappa: un fiume ad ovest, un grande albero negli immediati paraggi. Consigliamo di procedere verso l'albero. Partendo dall'uscita della foresta, continuate verso est, arrivando al labirinto della foresta. Dovrete ora localizzare i fiori bianchi nei pressi dell'uscita. Dopo la scena di intermezzo, continuate verso est, superando la statua. Dunque fatevi strada verso nord, poi sud, localizzando nuovamente la statua.
East, exit the maze, then east again, arriving at the Forest of Dawn. Right, move the trunk forward, so as to "hook" it to the previous area. Follow the nearby path, arriving at the southwest exit.
Gidona Crater
On the back, you can locate the towers of the Big Tree. Make your way to the monolith to the north. So, before turning east, exit north, returning to the Forest of Dawn. Drop the drawbridge, so as to create a connection with the previous area. Exit south, arriving at the crater of Gidona. When you reach the monolith, turn right.
Comfortable
After the cutscene, proceed to the outside. Walk slowly forward, avoiding getting caught by patrols. When you reach the lights, tap them to display a Flashback, during which Adol can talk to the members of the village. After another cutscene, you'll need to proceed to Ancient Burrow. Make your way past the southwest exit after you pass the village. Follow the path until you reach the actual monolith.
Ancient Burrow
Karna si unirà al vostro gruppo. Dopo il combattimento e la scena di intermezzo, procedete verso l'estremo "est" dell'area di gioco, per attivare le abilità di Karna. Continuate avanti per arrivare alla zona seguente.
La mini-mappa mostrerà dunque tre uscite, da cui emergono dei nemici di dimensioni molto piccole. Ignorateli momentaneamente, procedendo poi verso est. Ordinate a Duren di sfruttare le sue abilità per aprire la cassa, prima chiusa, nei pressi dell'uscita.
Continuando avanti, raggiungete la piattaforma a sud-est. Karna potrà "lanciare" il suo coltello. Seguite poi il sentiero, superando la cassa sulla sinistra, arrivando alla piattaforma a nord-ovest. Colpite i primi due "obiettivi", causando la caduta di una cassa del tesoro. Toccate il vicino monolite, salvate il gioco.
Boss: Melldrabie
L'avversario è dotato di 6140 punti-vita e non presenta delle debolezze peculiari. Il personaggio che vi consigliamo di utilizzare in questo combattimento è Karna, grazie alla sua capacità di colpire dalla distanza nonché alla sua maggiore velocità (rispetto a Adol e/o Duren). Dovrete però prestare attenzione ai suoi attacchi a base di "tuffo".
Avendo sconfitto il boss, procedete verso l'area seguente, recuperando il braccialetto. Avvicinatevi al tunnel, continuando verso sud. Fate in modo di tornare alla vostra forma "standard", risulta necessario per avere un buon livello di difesa.
Once the battle is complete, enter the tunnel on the left. North, arriving at the prison. Zoom in, get rid of the nearby monsters, then zoom out again. Enter the tunnel to the west, locating the chest containing the second fragment. Return to the main play area, making your way to the mines to the north. Your final target will be the area immediately east. Then continue towards the exit on the right, taking the chest and recovering the fragment that was inside it. You will now have all three necessary fragments. Go back to the tunnel, continue north. Touch the monolith, then use the touch screen to relocate the pieces. Save your game, then deal with the next boss.
Boss: Glucarius
L'avversario dispone di 6140 punti-vita. Consigliamo di preferire inizialmente una strategia del tutto aggressiva. Dovrete poi utilizzare il vostro attacco "Extra" solo quando il nemico effettuerà la sua mossa finale: lo vedrete arrotolarsi e formare una palla che si proietterà lungo tutta la zona di gioco, causando gravi danni a qualsiasi cosa verrà colpito. Continuate a schivarla fino a quando si fermerà improvvisamente nei pressi di un muro, stordita: a quel punto, sarà possibile colpirla a ripetizione alla testa.
Dopo la scena di intermezzo, fate ritorno a Comodo, per vendere eventuali manufatti e completare (se volete) delle sotto-missioni. Potrete poi tornare a Casnan, procedendo verso nord e raggiungendo la Grande Foresta. Fatevi poi strada verso l'entrata alla Forest of Down, utilizzando il vicino monolite per fare ritorno alla città. Continuate dunque verso il fiume segnato sulla mappa. "Uscite" da Comodo, muovendovi poi verso nord lungo il flusso di corrente. Fate scendere il ponte levatoio, continuate verso ovest.
Footage - American Launch Trailer
Misty Peak / Algon River
You will have to continue your descent here. Start by making your way east, twice in a row. When you get to the next area, you can locate the "next" part of the path just south of your area. Then west, pass the rock, and continue down still further. Then go down the hill, then turning left. Here you can find a monolith; pass it to reach the end of the play area. Follow the path that leads to the monolith to the north. Examine the area immediately to his right. Then continue north, arriving inside the next village. Ozma will be included in your party. Continue south, arriving at Spardas' lair.
Sacred Beasts Lair
Il vostro obiettivo, in questa zona, consiste nel riuscire a raggiungere la parte più profonda della struttura di gioco, facendo ricorso alle abilità di Ozma (in grado di "perforare" i muri). Fatevi anzitutto strada verso la stanza a nord, contenente delle casse del tesoro (in una di esse troverete il frammento necessario a completare il dungeon). Tornate poi verso l'area centrale. Entrate nella stanza a ovest. Ordinate a Ozma di penetrare i muri nelle zone subito a nord e subito a sud dell'area di gioco. Vi ritroverete dunque nell'area centrale. Nuotate verso le scale a nord-est, salendo verso il monolite. Salvate il gioco, vi attende un boss.
Boss: Volnake
L'avversario è dotato di 10200 punti-vita, e non presenta molte particolarità, eccetto il suo attacco "spray" in grado di infliggere danni ai soggetti collocati in un raggio di 360 gradi attorno a voi. Consigliamo dunque un approccio offensivo, così da minimizzare la probabilità che egli riesca a completare questo attacco.
Defeated the enemy, continue north, reaching the next room. Go back to the main play area, retrieving the treasure chests below. Swim to the east room. North, hook onto the wall to get to the next chest. Return to the previous room, moving south. Swim towards the tunnel, then north again, to the Y-shaped intersection. Proceed along the path to the right, retrieving the puzzle piece from the chest. Then go back, swim south, go up the stairs.
Cross the bridge. Enter the water, ordering Ozma to destroy the rocks, so as to create a bridge that your characters can cross. Follow the path north-east. Enter the water, then continue along the path to the left to take the last fragment. Go back, then continue east, then north. Follow the path, up to the monolith. Right, have Ozma hit the pillar, so as to "connect" to the previous floor. Swim to the next area, then watch the cutscene and then proceed to the boss battle.
Boss: Angoraboras
Avversario dotato di 4190 punti-vita. Vi troverete inizialmente in una piccola "striscetta" di terreno. L'avversario salterà periodicamente lungo l'isola che compone l'area di gioco principale. Consigliamo di attaccarlo tutte le volte in cui si fermerà e/o quando rimarrà stordito a causa del suo continuo saltare. Il vostro obiettivo primario dovrà essere l'oggetto rotondo visibile nei pressi della fronte del nemico.
Dopo la scena di intermezzo, potrete tornare a Selray. Ozma uscirà dal vostro party.
Casnan - Ritorno
Before you can continue, you will need to complete two sub-quests.
Subquest: Challenge!
I vostri clienti, in questo specifico caso, saranno Evan e Lyle, visibili all'interno della piazza cittadina. La vostra ricompensa saranno dei minerali d'oro. In pratica, dovrete recuperare il minerale per conto di Evan e Lyle. Quest'ultimo personaggio vi fornirà in dettaglio le necessarie indicazioni: i minerali saranno caratterizzati da una colorazione giallastra. Li potrete trovare nelle seguenti zone: 1. A sinistra del bar. 2. Nel lavandino, all'interno della casa. 3. Nelle stalle. 4. Nei pressi del retro del vicolo. 5. All'interno di una tenda, davanti all'ufficio governativo.
Subquest: Miners Wanted
Il vostro "Cliente" sarà Wagner, localizzabile all'interno della miniera. Per trovare gli oggetti necessari al completamento della quest, consigliamo di iniziare dalle rocce a voi più vicine, per poi muovervi in senso orario.
After the cutscene, you will find yourself with Karna. After passing a few more cutscenes, return to Selray. Continue north, solving the nearby puzzle to get to the underground ruins.
Underground Ruins
Dopo la scena di intermezzo, superate la statua. Ovest, sud, prendete la cassa. Saltate in acqua, percorrendo dunque il successivo tunnel. Destra, recuperate la cassa del tesoro. Sinistra, altro tunnel, salite le scale. Sinistra, prendete la cassa. Ovest. Usate il braccialetto per arrivare alla zona seguente. Al bivio, su, poi destra. Giunti alla stanza seguente, salite le scale e seguite il percorso fino alla cassa. Tornate dunque indietro, rimpicciolitevi, e procedete verso sinistra. Scendete le scale a destra, seguendo il percorso verso l'uscita. Rimpicciolitevi, continuate verso ovest. Giunti nei pressi della cassa, procedete verso sud, poi est. Recuperate un'altra cassa a ovest. Tornate indietro, procedete lungo l'uscita in alto a sinistra. Toccate il monolite, preparandovi ad una battaglia con il boss.
Boss: Elvaron
The opponent has 6600 life points. Unfortunately for you, during the early stages of the game his only vulnerability will be his legs: so avoid wasting time attacking the trunk, it is preferable to aim directly at his legs, "reset" them, and then move on to the torso. After the battle, go up the stairs. Observe the cutscene.
Highlands
Toccate il monolite, dunque procedete lungo il sentiero. Giunti alla successiva area di gioco, deviate verso destra raggiungendo una zona con una luce. Tornate poi indietro, continuate verso nord, percorrendo il ponte di corda. Toccate il monolite, continuando verso la città.
Dopo le scene di intermezzo, procedete attraverso le finestre nei pressi dell'altare. Sinistra, seguite la ragazza lungo le scale. Dopo le scene di intermezzo, parlate con Calica, la quale vi condurrà lungo la città. Dovrete, in sequenza, conversare con alcuni soggetti: entrate nella casa all'estremo sud per parlare con Simon e Betty; entrate nell'edificio di colore rosa, nei pressi del bar, per parlare con Werner; entrate nella casa a sinistra di quella del sindaco per parlare con Dario; entrate nell'edificio arancione a ovest per parlare con Timali e Philemon; entrate nella cappella per parlare con Lisa e Mariana.
Then return to the cemetery, near the underground ruins. After the excavation, go back to the mayor. You will then have to leave the Highlands, using the north exit.
Sanctuary
Superate il monolite, nonché l'uscita sulla sinistra. Nord, verso l'area successiva. Recuperate la cassa, dunque tornate indietro e procedete verso la successiva zona di gioco. Seguite il sentiero fino al monolite. Dunque andate verso nord; verrete lì colpiti da un fulmine. Appena Calilica si unirà al vostro gruppo, guadagnerete la possibilità di "dare energia" agli apparecchi in zona. Muovetevi a zig-zag per attivare i primi tre apparecchi (nella prima zona di gioco), dunque il quarto nell'area immediatamente successiva. Toccate il monolite, entrate nella torre.
Tower of Providence
The objective in this area is to use Calilica's abilities to proceed further towards the central part of the tower. You can find a first item in the northwest area. Use it to create a bridge that leads to the east area. Then continue to the right again, using the bracelet to reach the chest. Collect the contents, then head back to the left along the ramp that leads to the next area. Here you will have to use Calilica again to "energize" the objects in the area, so as to move the floor and proceed. Start at the chest in the southwest area. Continue towards the central area, giving energy to the first object. Continue along the new path, energizing all objects along the way. Once this is done, proceed to the right, along the ramp that leads to the next area. Interact with the monolith to start the boss battle.
Boss: Krell-Emecia
Questo boss troverà "l'accompagnamento" di Zandabal, alcuni piccoli artefatti a forma di sfere, e Litonileah - degli artefatti dotati di un campo di forza magnetico. Distruggeteli velocemente per rendere inoffensivo il nemico principale.
After defeating the boss, you will get the "Gale Shoes", which allow you to maximize your running speed as well as run along walls. Make your way to the next floor, dodging attacks along the way. Once in the area, activate the nearby machinery to cause the platform to rise. Use the Gale Shoes to walk the platform at speed (they will fall upon contact with your weight).
Fermatevi poi al centro del sentiero, salendo sulla prima mattonella, cadendo poi verso una piattaforma con associata una cassa. Saltate giù, destra, usate l'ascensore per tornare su. Correte alla massima velocità per arrivare al lato opposto. Recuperate la cassa a nord-est. Salite la rampa nei pressi del centro della stanza. Qui giunti, attivate con l'energia l'oggetto alla vostra destra. Correte avanti, schivando le mazze in arrivo, arrivando alla cassa prima che il portale si chiuda.
Tornate dunque indietro, attivando il macchinario a est per causare la "discesa" del cancelli, così da poter salire lungo la rampa che conduce all'ultimo piano. Toccate il monolite, procedete verso destra recuperando il contenuto della cassa, vedendovela poi con il boss.
Boss: Krell-Emecia
The boss has 8510 life points. We recommend that you initially focus your "firepower" on his arms, passing only later to the rest of his body.
Defeated the enemy, you can meet Eldeel. After the cutscene, you will return to the Highlands. Battle the masked men, enjoying the subsequent cutscenes. After regaining control of the character, talk to the mayor, who will give you the golden wings. You can now return to any place you previously visited. Your ultimate goal will still have to be the forests of Ashen.
Table Mountain
Teletrasportatevi verso l'entrata alla torre della provvidenza. Uscite verso ovest, seguite il sentiero verso il basso, proiettandovi dunque verso la piattaforma. Karna dovrà ora "aprire" il sentiero che torna al santuario. Uscite poi verso sinistra.
Il sentiero si dividerà in due "parti", entrambe conducono tuttavia alla medesima area di gioco. Recuperate nel frattempo la cassa del tesoro nell'area sud, uscendo poi verso destra. Vi troverete di fronte ad un bivio: andate a sud per trovare un monolite e l'uscita. Create un accampamento, dunque uscite verso sud e scendete verso la parte più bassa della montagna. Raggiungerete la foresta sotterranea. Seguite il sentiero di fronte a voi, ignorando la prima uscita e procedendo invece avanti, fino a localizzare una seconda uscita che procede verso nord.
Danan
Dopo la scena di intermezzo, potrete cominciare a parlare con gli abitanti del villaggio. Procedete verso la casa degli anziani, che verrà indicata sulla mappa da un colore viola (al terzo piano). Osservate la scena di intermezzo, procedendo dunque al combattimento contro il boss.
Boss: Sol-Galba
The opponent has 7110 life points. The combat has no real peculiarities, you can almost "limit" yourself to dodging and attacking repeatedly.
Dopo la scena di intermezzo, potrete finalmente raggiungere le Ashen Forest.
Ashen Forest
Andatevene da Danan, procedendo verso destra e superando la vicina uscita. Toccate il monolite, raggiungendo l'entrata della foresta. Dopo la scena di intermezzo, dite a Frieda di creare un percorso che superi la lava. Deviate verso est, poi sud, prendendo la cassa. Tornate poi indietro, continuando lungo l'uscita a nord. Potrete dunque trovare una cassa a nord-ovest. Uscite poi verso est, raggiungendo l'ultimo accampamento. Fate poi ritorno verso la zona ove avete trovato la prima cassa. Uscite verso ovest. Recuperate un'altra cassa a nord. Uscite verso ovest, dunque continuate a nord, facendovi aprire il sentiero da Frieda (verso destra, ove si trova l'uscita alla zona di gioco). Sarà possibile creare un accampamento procedendo verso l'uscita all'estremo ovest; tuttavia, al momento, non sarà possibile procedere attraverso la Foresta di Spore. Consigliamo dunque di procedere lungo l'uscita a nord, superando il tempio antico e facendovi strada fino alle paludi. Continuate dunque verso l'uscita all'estremo est. Toccate il monolite in zona, combattendo fino a raggiungere la pensione. Per aprire il vicino cancello sarà necessario posizionare le rocce sulla bilancia. Poi entrate per cominciare il combattimento con il boss.
Boss: Ribbi-Roi
The opponent has 8500 life points. We recommend that you focus your "initial" attention on the small frogs present in the area: they seem harmless, but are able to slowly but perniciously decrease your life points. When these have been eliminated, you can move on to the "main" boss: focusing all your energy on him, you should be able to finish him with considerable ease.
Now go back to the muddy area. Proceed south, returning to the previous part of Ashen's forest. Take the exit to the southwest, arriving at the camp (you will then need to exit to the west).
Forest of Spores
Uscite dall'accampamento, avvicinandovi al monolite. Procedete lungo il sentiero verso sud, distruggendo le barriere lungo il percorso, recuperando le associate casse. Spostatevi dunque verso l'uscita a nord, utilizzando gli artigli della bestia. Toccate il monolite per cominciare la battaglia contro il boss.
Boss: Mustrum
E' dotato di 12700 punti-vita. Negli immediati dintorni potrete notare una discreta quantità di funghi, denominati Polestol: come visto per il precedente boss, è consigliabile eliminare tali esseri prima di focalizzarvi sul soggetto principale. Quando potrete infatti focalizzare su di esso tutta la vostra attenzione, riuscirete ad abbatterlo in velocità.
Continuate dunque verso l'area successiva, usando gli artigli del Re per raggiungere la cassa a nord-est. Superatela, continuando avanti, prima verso nord e poi verso est.
Colonia Battlefield
Continuando verso nord, raggiungerete un monolite e una porta - purtroppo - per ora insuperabile. Tornate dunque verso la prima zona della Colonia Battlefield, procedendo verso est per arrivare ad un monolite e all'uscita.
Video - Trailer E3
Elduke
Dopo la scena di intermezzo, salite le scale, evitando le zone "fittamente" popolate da soldati. Scendete la seguente rampa di scale. Appena Karna comincerà ad udire qualcosa, seguite lo stretto sentiero che conduce alla Room's Nest. Parlate con il Grand Roo, visibile sul retro: trattasi dell'unico soggetto in grado di conversare con gli umani. Dunque, rivolgetevi al mercante nei pressi dell'entrata: nonostante non sia in grado di comunicare con voi, sarà possibile barattare con lui parte dell'equipaggiamento. Dopo la conversazione con Grand Roo, tornate al tempio. Procedete verso l'alto, poi verso destra, recuperando la cassa del tesoro. Parlate dunque con Roos. Uscite verso est, poi sud, raggiungendo un ponte che conduce alla Foresta di Ashen. I vostri nuovi obiettivi saranno il Vesuvio e il lago Tolmes. Partendo dal Vesuvio, procedete verso nord ed interagite con il vicino monolite.
VESUVIO
Proseguite lungo il sentiero, superando le barriere di neve. Salite la vicina piattaforma (sulla sinistra), sicché Karna possa aprirvi l'accesso al resto del sentiero. Entrate nella caverna. Procedete avanti fino ad una zona ove Frieda potrà sigillare due crepe: sigillate la crepa sulla destra, facendovi poi proiettare verso la piattaforma sulla sinistra, recuperando dunque una cassa del tesoro. Sigillate poi la crepa a sinistra, salendo lungo la piattaforma a destra.
Now go back to the cave. Drop down, then to the right, examining the mineral rock. Then go out to the area at the bottom left, taking yet another box. Then go back inside, approaching the north exit, thus visualizing an intermission scene. Get rid of the masked soldiers that will come on stage, then exiting the cave. Climb up the mountain, paying attention to the snowballs that will be thrown by Avabish. Also pick up the chest in the far northeast area. Return to the previous platform, asking Karna to use her abilities to allow you to proceed. Make your way up the "new" path to get to another cave. Approach the monolith to the north. Save, get ready for the boss fight at the end of the level.
Boss: Bami
L'avversario è dotato di 18100 punti-vita. Potrete immediatamente notare come tenda ad evocare, nei suoi immediati dintorni, delle creature di nome Mesarabadi - delle specie di pipistrelli. Trattasi di soggetti deboli nei confronti di "Pierce". Consigliamo di liberarvene il più velocemente possibile, per poi - come fatto con i boss precedenti - continuare a colpire Bami con degli attacchi speciali, sfruttando i punti Extra che avrete accumulato durante il periodo precedente. Attenzione agli attacchi a base di fulmini che verranno usati dal vostro nemico.
Dopo la scena di intermezzo, dovrete tornare a Root's Nest. Partendo dalla periferia di Elduke, muovetevi lungo l'uscita a sud-ovest. Il sentiero si dividerà in due - ma entrambe le possibilità conducono alla medesima area, l'uscita nord-est. Localizzerete ora le rovine del Lago Tolmes. Prelevate la cassa del tesoro sulla sinistra, dunque toccate il monolite ed entrate.
Lake Tolmes
Deviate verso sinistra, salite le scale. Sud, prendete la cassa. Nord, usate le scale a sinistra per scendere verso l'acqua. Recuperate la cassa a sud rispetto alla piattaforma ove vi trovavate in precedenza. Continuate verso l'alto, superando l'ennesimo corso d'acqua che "scende" dal muro. Muovetevi completamente verso destra. Salite le scale, uscite verso sud. Vi ritroverete nello stanzone principale. Muovetevi completamente verso sud, poi ovest, prendendo la cassa. Sfruttate l'uscita a destra. Dite ad Adol di toccare la luce. Giunti alla seconda piattaforma circolare, scendete verso il corso d'acqua, poi recuperate la cassa a ovest, dunque aprite la cassa (prima chiusa) a nord. Fatevi strada verso l'uscita a nord-ovest, recuperando tre casse, prima sott'acqua. Tornate ora indietro, nuotando lungo il canale per raggiungere l'uscita a centro/ovest. Muovetevi verso nord, dicendo a Callica di attivare l'energia, così da causa l'inondazione della stanza. Scendete lungo le rampe nei pressi dell'area centrale, recuperando la cassa del tesoro. Nuotate giù, poi ovest, raggiungendo il muro (prima distrutto). Nuotate su, lungo la rampa, poi uscite verso nord-ovest. Saltate in acqua, poi sud, uscite dall'acqua e continuate verso l'uscita a est, recuperando l'ennesima cassa. Tornate dentro, uscendo verso sud. Salite le scale, attivando l'energia, sfruttando l'apparato visibile a nord. Potrete dunque farvi strada verso la cassa del tesoro, a destra. Dopo la scena di intermezzo, salite lungo le rampe, toccate il monolite, e preparatevi per il combattimento contro il boss.
Boss: Gadis
Il boss avrà a disposizione 21700 punti-vita. I suoi "assistenti" in questo combattimento saranno i Dagbanthers. Come visto per i boss immediatamente precedenti, consigliamo di eliminarli alla massima velocità, per poi schivare subito: in questo modo, sarete in grado di evitare i tentativi di "prendervi" da parte di Gadis. L'avversario dispone di una grande quantità di punti-vita, dunque non preoccupatevi se non riuscirete ad eliminarlo velocemente: è del tutto normale. Quando/se lo vedrete preparare un attacco basato su un "raggio" infuocato, sarà il momento di sfruttare la vostra mossa "Flash".
After the cutscene, head back to Room's Nest. Talk to Roda, obtaining an artifact in exchange for completing the previous level. So make your way to the Colonial Battlefield, starting from the Forest of Spores and / or Elduke.
Colonia Battlefield
Liberatevi del guardiano nei pressi dell'entrata. Continuate verso l'uscita a nord-est, raggiungendo un vicolo cieco. Scendete lungo l'area esagonale, deviando poi verso l'uscita ad est. Passate ad usare Adol, distruggendo così le armi piantate al suolo.
Go up the stairs to the north. Then continue south, viewing an intermission scene. Continue further south, reaching the following play area. Take advantage of the dwarf bracelet, reaching an area where you can go down the stairs and retrieve a chest. So go back to the area where you got the first bracelet. Continue west, then north, reaching the next flight of stairs. Interact with the chest in the upper right corner next to the flight of stairs. Continue along the path to the east. Then north. Up, west, interact with the monolith. Pick up the chest at the top left. Get past the first "living" weapon. Extract its contents, then following the exit to the southwest. The next room will contain two different exits: go east.
Use the bracelet to reduce your size by entering the tunnel. At the crossroads, turn left and open the chest in the area. Go back to the fork, then drop down. Another crossroads: right, recover the contents of the nearby chest. So go back, then continue north, going down yet another flight of stairs. Follow the path forward, passing the mirror. Exit north, then go up the stairs (still north). Cross the bridge, arriving at the monolith.
Boss: Sol-Galba
The opponent has 10700 life points. This is a "simple" boss, with a very limited attack area. We recommend hitting him repeatedly in the moments when he will fall forward, when he is most vulnerable.
After the cutscene, head back to the Root's Nest, proceeding to the Sun Temple. Proceed up the steps. Observe the cutscene, and then the final boss fight begins.
Boss: Eldeel, the Black-Winged God
L'avversario è dotato di 27700 punti-vita. Consigliamo di focalizzare i vostri attacchi negli istanti in cui egli non starà volando lungo l'area di gioco: è preferibile tentare di colpirlo quando egli si trova agganciato al terreno, sicché i vostri colpi vadano più facilmente a segno.
Iris - World of Records
The zone is divided into three sub-zones: bronze, silver and gold. Proceed first towards the center, touching the monolith. Then deviate to the left, reaching the Bronze area. You will find yourself having to solve a puzzle that requires the movement of the "pieces" of the floor in the area.
Proceed upwards, climbing to the first floor panel. Continue to the opposite side. You can choose between two panels: go up on the panel to the south. Use the new bridge to reach the chest on the right. You will find a second one immediately south. Then go back, going up the panel to the north. Continue north, climbing up to yet another panel. Continue to the panel in front of you, and continue to the west part of the level. Collect the chest to the north. Go down the curved path.
Use the dwarf bracelet to proceed by reading the sign on the opposite side and pulling your hands in the air to deactivate it. North, go up to the panel. Continue up, then left, going up to another panel. So south, then forward, south again. Climb up the panel on the right, clearing your way to the golden chest. Go back, continue all the way to the left, retrieving the chest. Climb on the nearby panel, then continue straight ahead, swerve to the left, then drop down and continue straight towards the crate, previously closed. Move south, across the bridge and up to the second panel from the top. Then proceed up, then right, avoiding the flashing panel on the left. Run to the right, reading the sign.
Enter the mirror on the left, move southwest to reach the chest. Open it, go back and enter the mirror to the north. Up, left, then north - retrieving another chest. Go back, move beyond the nearby portal to find yet another chest. Go back again, then east. Go through the southeast portal, then south, and get the chest. Go back through the portal, continuing to the northeast. Go through yet another portal, then continuing straight ahead to get a chest.
Always back along yet another portal, then go up and move southwest once you reach the crossroads, arriving at a (closed) chest and two additional crates placed next to it - you will have to open them all. So return to the previous area, continue north. Open the golden chest, then tap the monolith to start fighting the enemy.
Boss: Girguzalm
La battaglia dovrebbe rivelarsi molto semplice, data la disparità in potenza d'attacco e difesa tra voi e il vostro avversario - per vostra fortuna, a vostro favore.
Iris - Silver Area
Move all the way to the right, past the circular area. Retrieve the Wind Crest from the chest. Return to the round area, interacting with it. Continue north, letting the wind carry you. Climb up the ramps, being transported to a platform on the left. Continue to the cashier. Return to the control area, holding the Wind Crest up again. Head down to the southeast and retrieve the Rain Crest from the chest. Go back to the control panel, this time by raising the Rain Crest. Continue northwest, swimming through the pool, making sure to retrieve the various golden chests along the way. Follow the path forward. When you reach the crossroads, turn right. Take the two crates in the area. Go back, then continue northwest to reach yet another control panel.
Hold the Wind Crest aloft, moving towards the north edge, using the wind to reach the golden chest. Back at the main panel, use the Sun Crest to cause the ice to melt along the path to the southwest. Proceed up, retrieving the crate along the way. Go up the ramps to the northeast area where you can see two crates. Pick them up, then continue southwest. Yet another control panel: also use the Wind Crest on it. Collect all the objects that appear around, then go back to the control panel and use the Rain Crest. Go up the southeast ramp, swimming along the pool to get to the upper level. Right, use the elevator to reach the previous area. At the control panel on the right, use the Sun Crest. Take the elevator back, use the Gale Boots to run north, then along the wall. Touch the monolith to deal with the boss.
Boss: Zerivutz
The opponent has 33000 life points. Your approach must be identical to that indicated for previous enemies.
Iris - Gold Area
The objective of the level is the rotation of three circles, with the aim of creating paths that lead to the control panels. You will have to try to associate the flashing lines with the hexagon shapes. Follow the standard path first, then right to get a chest. Go back to the panel. Examine the panel on the right, turning the center circle to connect the yellow hex with the 4 o'clock hex. For the last "connection", combine the inner circle to connect the yellow hex with the blue hex.
At the next play area, enter the mirror to start a battle. Then turn the circle in the center, connecting to the yellow hex to the north. The outermost circle must therefore connect the two hexagons on the right. Follow this pattern, passing the mirror. Exit, use the control panel to connect the two hexagons using the central circle. Then use the inner circle to connect everything to the panel at 10 o'clock. Follow the path that leads to the chest. Return to the control area.
So make sure that the second circle connects the hexagon to the stairs to the north. You can then locate another control panel in the area. Make the circle in the center connect to the ten o'clock zone, then the outer circle should connect to the next control panel, on the far left. Move beyond the mirror to start a fight, and remove the third seal. Back at the control panel, connect the outer circle to the area at 10 o'clock, then the central circle to the last control panel. Go through the mirror, then breaking the last seal. To return to the stairs, you will need to take advantage of the control panel nearby. Make the center circle connect to the ten o'clock zone, then the outer circle to the far left panel. So use the circle at the outermost extreme to connect everything at ten, then the central circle to make a new connection towards the stairs. Go up the stairs, retrieve the contents of the golden chest, touch the monolith and start the fight against the final boss.
Boss: Bulaghoul
The opponent has 33000 life points. Since this is your penultimate battle, we simply recommend that you "harness" all the energy you have left to inflict as much damage as possible in a short amount of time to the enemy.
So go back to the crossroads. You can use the teleporter in the center of the play area, then retrieving the crate behind you. Continue north, reaching the monolith.
Boss: Akasha-Glyph
The enemy has 70600 life points. The battle will necessarily last some time, due to the opponent's high life points. As in other cases, we recommend that you focus your initial attention on eliminating the "secondary" enemies that surround your "main" opponent. In this way, you can increase the level of your "Extra" bar. Following the complete accumulation, it will allow you to make a very fast attack on the enemies in the surroundings, pulverizing them without problems.
Dopo la battaglia, visualizzerete una grande quantità di scene di intermezzo. Dopo la loro fine, consigliamo di correre verso l'esterno del tempio del sole. Seguirà una scena di intermezzo: consigliamo di seguire le indicazioni sullo schermo. Continuate verso la cima, per trovarvi di fronte all'ultimo combattimento.
Boss: Phantom-Gruda
L'avversario è dotato di soli 7220 punti-vita. Consigliamo dunque di utilizzare tutti i vostri oggetti capaci di danneggiare l'avversario, per massimizzare i danni a lui inflitti nella minore quantità di tempo possibile.
Video Solution - Playlist
Click here for the playlist!
Video Solution - Casnan
Video Solution - Ozma
 Ys: Memories of Celceta psvita
- Playstation Vita
- pc
- ps4
Exit date: February 20 2014