- Page 1: Death Stranding, The Complete Guide
- Page 2: Death Stranding | How to transport Pizzas (and unlock custom HG weapons)
- Page 3: Death Stranding | Trophy Guide (Platinum 100%)
- Page 4: Death Stranding, strategic guide to structures
- Page 5: Death Stranding: 6 Essential Tips To Get Started
- Page 6: Death Stranding | Bridge Link and Contracts Guide
- Page 7: Death Stranding: How To Get Like Fast
- Page 8: Death Stranding: Courier Level Guide
- Page 9: Death Stranding: All Memory Chips And Where To Find Them
- Page 10: Death Stranding, guide to face the MULES
- Page 11: Death Stranding | Guide to Cronopioggia
- Page 12: Death Stranding: How To Escape The CAs (Or Defeat Them)
- Page 13: Death Stranding: The Best Signs (And Their Bonuses)
- Page 14: Death Stranding | Guide to Famous Preppers (Cameo)
- Page 15: Death Stranding | Teleportation Guide (without spoiler)
- Page 16: Death Stranding, guide to free yourself from the Bomb of Episode 3
Whenever you complete an order in Death Stranding you will get one evaluation. In this short guide we will try to deepen the parameters by which your performance will be judged. The criteria taken into consideration are five and are displayed in a star-shaped diagram in the menu sections and in the final screen after each delivery made. So let's see what are the parameters to be taken into consideration during the game.
- Bridge Link: the connections you have established in Death Stranding. This parameter is influenced by "likes" that you will get during the deliveries in particular for the structures that you have placed on the ground.
- Load Conditions: This parameter is affected by the damage caused by falls or from rain time, original mechanics of Death Stranding. Each order includes a maximum percentage of damage deemed acceptable to consider the delivery as successful. In the first orders this value is around 50%.
- Various: this parameter is higher in case you found out during the delivery new routes or have passed through areas with a strong presence of CA, the "ghosts" of Death Stranding. It will also be affected by the likes you get after cleaning up the fields of MULES and delivered if any lost loads of other couriers.
- Delivery weight: this parameter is influenced by the quantity of cargo that you will be able to deliver and is strictly linked to the requirements of the orders you will accept. In some you will have to limit yourself to delivering only a minimal part required, in others you will have the ability to add bonus weight to the load also delivering available optional parts that you will find around or that will be available when you accept the order.
- Delivery time: parameter available only if required by the order you have just completed. Some deliveries, in fact, foresee a countdown in Death Stranding: the faster you are, the better the evaluation will be.
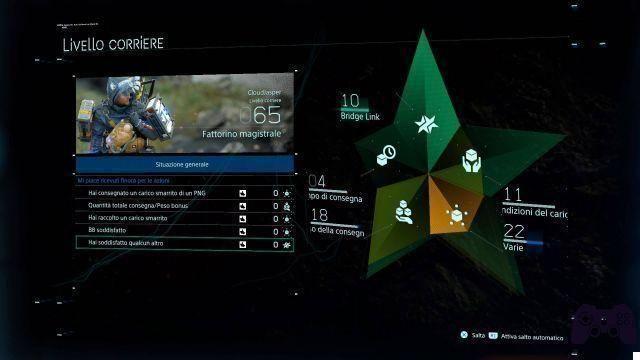
The final screen of each order will also show the Courier level reached in Death Stranding which will be influenced by the total number of Likes that will be assigned to you by completing the order and which depend, for example, on the quantity and average damage of the cargo and in general on the situation of the delivery just made. The number of Likes assigned at the end of each order can also be increased by choosing a higher degree of difficulty when the delivery is accepted in order to have a more stringent time limit and to lower the maximum damage threshold of the cargo. Improving these five parameters will also help unlock (on average every ten levels) skills for Sam.
For example, raise the level of the Bridge Link in Death Stranding will allow you to increase the number of contracts that can be stipulated with other couriers, to ask for materials for structures from other players and to reduce the time limit of consecutive Likes that can be assigned to the buildings of others. As the parameter increases Conditions of the load will improve Sam's balance while Delivery weight will increase the overall capacity and finally Delivery time will increase the character's stamina bar.